The Ultimate Guide to Indoor Cannabis Cultivation for Home Growers
You’ve reached our long scroll style indoor grow guide, with more detail and ease of continual reading. Click here to go to our simple 1 page grow guide & table of contents version of our indoor grow guide.
Are you a cannabis enthusiast with a passion for growing your own plants?
Look no further — this comprehensive guide is your ultimate resource for successful indoor cannabis cultivation.
Whether you’re a beginner or an experienced home grower, this guide will provide you with the knowledge and techniques to harness the power of indoor growing and produce high-quality cannabis right in the comfort of your own home.
Indoor cultivation offers several advantages, including complete control over environmental conditions, year-round growing possibilities, and the ability to cultivate your favorite strains.
With the right equipment, techniques, and expertise, you can create an optimal growing environment that maximizes yields, potency, and overall plant health.
In this guide, we will walk you through every step of the indoor grow process, from selecting the right strain and setting up your grow space to managing lighting, temperature, humidity, ventilation, and nutrient requirements.
We will also cover essential topics such as seed germination, vegetative growth, flowering, harvesting, and drying techniques.
Whether you’re growing for personal use or aiming to develop advanced cultivation skills, our goal is to empower you with the knowledge and confidence needed to become a successful indoor cannabis grower.
Planning Your Indoor Cannabis Grow: Understanding Local Laws for Home Cultivation
Introduction:
In the rapidly evolving world of cannabis cultivation, more jurisdictions are allowing individuals to grow their own cannabis at home. While this may seem like a dream come true, it’s crucial to remember the strict legal requirements that must be followed to ensure compliance with local, state, and federal laws. In this blog post, we’ll discuss the essential legal requirements you need to know when starting your DIY indoor cannabis grow at home.
Know Your Local Laws for Home Cannabis Cultivation
The first and most crucial step in beginning a home cannabis grow is understanding the specific laws and regulations that govern cannabis cultivation in your area. Cannabis laws can vary significantly from one jurisdiction to another, making it essential to stay well-informed about the rules in your location. Here are some key aspects to consider:
- Cannabis Legalization Status: Determine whether cannabis is legal for recreational or medical use in your state or country, as this sets the foundation for other regulations.
- Plant Limits: Most jurisdictions impose limits on the number of cannabis plants you can cultivate at home. It’s crucial to know these limits to avoid legal consequences.
- Security Measures: Familiarize yourself with the security requirements for your cannabis cultivation, including measures to prevent unauthorized access and theft.
- Zoning and Land Use: Check local zoning regulations to ensure that growing cannabis is allowed in your residential area. Some places have restrictions on where cannabis can be grown.
- Homeowners Association Rules: If you reside in a community with a homeowner’s association, be aware of any rules or covenants that prohibit cannabis cultivation on your property.
- Environmental Regulations: Some areas have environmental restrictions on outdoor cannabis cultivation, such as water usage limits or restrictions on pesticide use.
Federal Legal Considerations
Even if cannabis is legal in your state, it remains illegal at the federal level in many countries, including the United States. Federal law can have an impact on various aspects of cannabis cultivation, such as banking, taxation, and interstate transportation. While federal enforcement has been limited in states with legal cannabis programs, it’s important to be aware of the federal stance on cannabis and be prepared for any potential changes in the law.
Conclusion:
Before embarking on your indoor cannabis cultivation journey, it’s crucial to understand and comply with the local laws that govern this practice. By researching and staying informed about the specific regulations in your area, you can ensure a legal and successful home cannabis grow. Remember, compliance with the law not only protects you from potential legal consequences but also contributes to the responsible and sustainable growth of the cannabis industry.
Choosing the Perfect Cannabis Strain: A Beginner’s Guide to Home Growing
Introduction:
As a beginner home cannabis grower, one of the most exciting aspects of starting your own garden is selecting the right strain to cultivate. With countless options available, choosing the perfect cannabis strain can seem overwhelming. But fear not! In this beginner’s guide, we’ll walk you through the essential factors to consider when selecting a strain for your home grow, helping you make an informed decision and set the foundation for a successful growing experience.
Why Choosing the Right Strain Matters
Selecting the right strain is crucial because it determines the characteristics and effects of the cannabis you’ll be growing. Each strain offers a unique combination of aroma, flavor, potency, and growth traits. By understanding your preferences and goals, you can choose a strain that aligns with your desired experience and cultivation capabilities.
1. Growing Difficulty:
For beginners, it’s recommended to start with strains known for their resilience and ease of cultivation, such as Blue Dream. Furthermore, autoflowering genetics offer the opportunity to grow weed like growing a tomato. Therefore easy to grow strains and auto’s are a great way to begin. For more information on auto’s, semi full terms, and photoperiod, see our blogs on Cannabis Light Cycle Types and / or Genetic Selection.
2. Space and Environmental Constraints:
Consider the size of your growing space, as some strains naturally grow taller or wider than others. Furthermore, evaluate the environmental conditions in your grow space—temperature, humidity, and light levels—which can influence strain selection. Remember, photoperiod strains will need to be held and veg and then later flipped, so factor this into your space considerations.
3. Desired Effects:
Think about the effects you’re seeking from the cannabis you grow. Are you interested in a strain that promotes relaxation and pain relief? Or would you prefer a more energizing and uplifting experience? Research the different cannabinoid and terpene profiles of various strains to find the desired effects that align with your preferences. Our catalog is categorized by Aroma Family which can help you find a strain with the proper effects, smell, and overall experience.
4. Yield and Flowering Time:
Consider the potential yield and flowering time of each strain. Some strains may produce higher yields but require longer flowering periods, while others provide quick turnaround times with smaller yields. Finding a balance between yield and time commitment is essential for a beginner grower. Auto’s can be grown more quickly, but their yield will be less. Our product pages and strain catalog are broken down by yield and flowering time, among lots of other useful information.
5. Personal Preferences:
Don’t forget to consider your personal preferences in terms of aroma, flavor, and the type of high you enjoy. Some strains offer fruity or earthy flavors, while others may have distinct floral or skunky notes. Photoperiod strains tend to offer better terpenes.
Research and Sample Different Strains
Once you have a clear understanding of your requirements, it’s time to research and sample different strains. Consider starting with a few different strains to gain exposure to various genetic profiles and determine which ones align best with your preferences and growing conditions.
Again, the best place to begin is by choosing the right light cycle type for your desired outcomes. For a current list of Atlas Seed strain offerings by light cycle type, see our blog on our 2024 Strain Catalog.
Start Your Growing Journey with Confidence
By taking the time to choose the right strain, you’ll increase your chances of a successful and enjoyable home-growing experience. Remember, as a beginner, it’s essential to start with strains that offer a balance of ease of cultivation, desired effects, and personal preferences. Cultivating the right strain will set the stage for a rewarding journey of watching your cannabis garden thrive and harvesting your very own high-quality buds.
In the next installment of our beginner’s guide, we’ll dive into the crucial aspects of setting up your grow space, providing you with the knowledge and tools to create an optimal environment for your chosen strain. Stay tuned for more insights and tips on becoming a confident and skilled home cannabis grower.
Cannabis Equipment for Indoor Marijuana Cultivation: A Comprehensive Guide
Introduction:
Selecting the right equipment for indoor cannabis cultivation is crucial for creating an optimal environment that meets the specific needs of marijuana plants. From lighting to ventilation and growing mediums, having the right tools plays a vital role in ensuring successful growth and maximizing yields. In this blog post, we will explore the essential equipment needed for DIY indoor cannabis cultivation, outlining their functions and importance in maintaining optimal growing conditions.
Cannabis Equipment List for DIY Indoor Home Cultivation
1. Grow Tent or Grow Room:
Create a controlled environment that allows you to manage light, temperature, and humidity for your cannabis plants.
2. Grow Lights:
Choose from High-Intensity Discharge (HID) lights like Metal Halide (MH) for vegetative growth and High-Pressure Sodium (HPS) for flowering, or opt for LED grow lights designed specifically for cannabis cultivation.
3. Ventilation System:
Ensure proper air circulation, control temperature, and remove excessive humidity or odors with an exhaust fan, intake fan, or vents.
4. Carbon Filter:
Minimize cannabis odor during flowering by using a carbon filter to filter the air leaving the grow space.
5. Air Circulation Fans:
Promote airflow, strengthen plant stems, and prevent stagnant air pockets by strategically placing small fans within the grow area.
6. Growing Medium:
Choose from soil, coco coir, rockwool, or hydroponic systems like deep water culture (DWC) or nutrient film technique (NFT) based on your preferred cultivation method.
7. Nutrients:
Utilize cannabis-friendly nutrients formulated for different growth stages, providing essential elements like nitrogen, phosphorus, potassium, and micronutrients.
8. pH and EC Meters:
Monitor and adjust pH and electrical conductivity (EC) levels of the nutrient solution to ensure optimal nutrient uptake by the plants.
9. pH Up and Down Solutions:
Use these solutions to adjust the pH of water or nutrient solution within the desired range for cannabis cultivation.
10. Watering Can or System:
Provide the plants with the necessary amount of water using a watering can, watering wand, or automated irrigation system, depending on your setup.
11. Trimming Tools:
Perform plant maintenance, pruning, and trimming with precision using pruning shears, trimming scissors, or other appropriate tools.
12. Drying Rack and Containers:
Dry and cure harvested cannabis buds before storage or consumption using a drying rack and suitable containers.
13. Timer:
Control the light cycle and maintain consistent day and night periods for the plants during different growth stages using a timer.
13. Thermometer and Hygrometer:
Measure temperature and humidity levels within the grow space to ensure optimal growing conditions for cannabis cultivation.
Conclusion:
When it comes to indoor cannabis cultivation, having the right equipment is essential for creating an environment that supports healthy plant growth and maximizes yields. By considering the equipment mentioned in this guide, you can set up a productive and efficient indoor cannabis garden. Remember to also adhere to any local regulations or legal requirements related to cannabis cultivation in your area.
HPS vs. LED Lighting for Indoor Cannabis Cultivation: Choosing the Right Option
Introduction:
Lighting is a crucial factor in indoor cannabis cultivation, impacting plant growth and yield quality. Two popular lighting options for cannabis growers are High-Pressure Sodium (HPS) and Light Emitting Diode (LED) lights. In this blog post, we will explore the differences between HPS and LED lighting, highlighting their unique characteristics and their impact on cannabis cultivation.
HPS Lighting for Cannabis Cultivation
- Spectrum: HPS lights emit light primarily in the red and orange spectrum, ideal for the flowering phase of cannabis growth. They promote flower formation and development, making them popular among cannabis cultivators.
- Heat Emission: HPS lights generate significant heat, requiring proper ventilation and cooling systems to manage temperature. The heat can also increase water consumption by the plants.
- Energy Efficiency: HPS lights are less energy-efficient compared to LEDs, consuming more electricity and having a shorter lifespan. This can result in higher maintenance costs over time.
- Cost: HPS lighting fixtures are generally cheaper upfront, although long-term operating costs can be higher due to energy consumption and shorter lifespan.
LED Lighting for Cannabis Cultivation
- Spectrum: LED lights offer customizable spectrums, allowing growers to fine-tune light output based on the specific growth stage. Full-spectrum LEDs provide blue and red wavelengths suitable for both vegetative and flowering phases.
- Heat Emission: LED lights emit significantly less heat compared to HPS lights, reducing the need for elaborate cooling systems and creating a more stable grow room temperature. In some setups, supplemental heating may be necessary to prevent an overly cold environment.
- Energy Efficiency: LED lights are highly energy-efficient, consuming less electricity compared to HPS lights. They provide substantial energy savings and are environmentally friendly in the long run.
- Lifespan: LED lights have a considerably longer lifespan than HPS lights, often lasting up to 50,000 hours or more. This reduces replacement and maintenance costs, providing financial benefits to growers.
Conclusion
When choosing between HPS and LED lighting for cannabis cultivation, growers must consider their specific needs and budget. HPS lights are suitable for flowering stages due to their spectrum
Optimizing Vapor Pressure Deficit (VPD) for Indoor Cannabis Cultivation
Introduction:
Effective climate control is essential for indoor cannabis cultivation, and one crucial aspect is managing the vapor pressure deficit (VPD). VPD plays a significant role in the health, growth, and productivity of cannabis plants. In this blog post, we will explore what VPD is, its significance in indoor cannabis cultivation, and strategies to optimize VPD for maximum crop success.
Understanding Vapor Pressure Deficit (VPD)
Vapor Pressure Deficit (VPD) represents the difference between the actual vapor pressure (VP) of the air and the saturation vapor pressure (SVP) at a specific temperature. VPD measures the “dryness” or “humidity” of the air in relation to the plant’s ability to transpire.
Significance of VPD in Indoor Cannabis Cultivation
Maintaining an optimal VPD range is crucial for the physiological processes of cannabis plants, including photosynthesis, transpiration, and nutrient uptake. When VPD is too low, plants may struggle to absorb water and nutrients, leading to stunted growth and reduced yields. Conversely, high VPD can cause excessive transpiration, depleting the plant’s water reserves and causing stress.
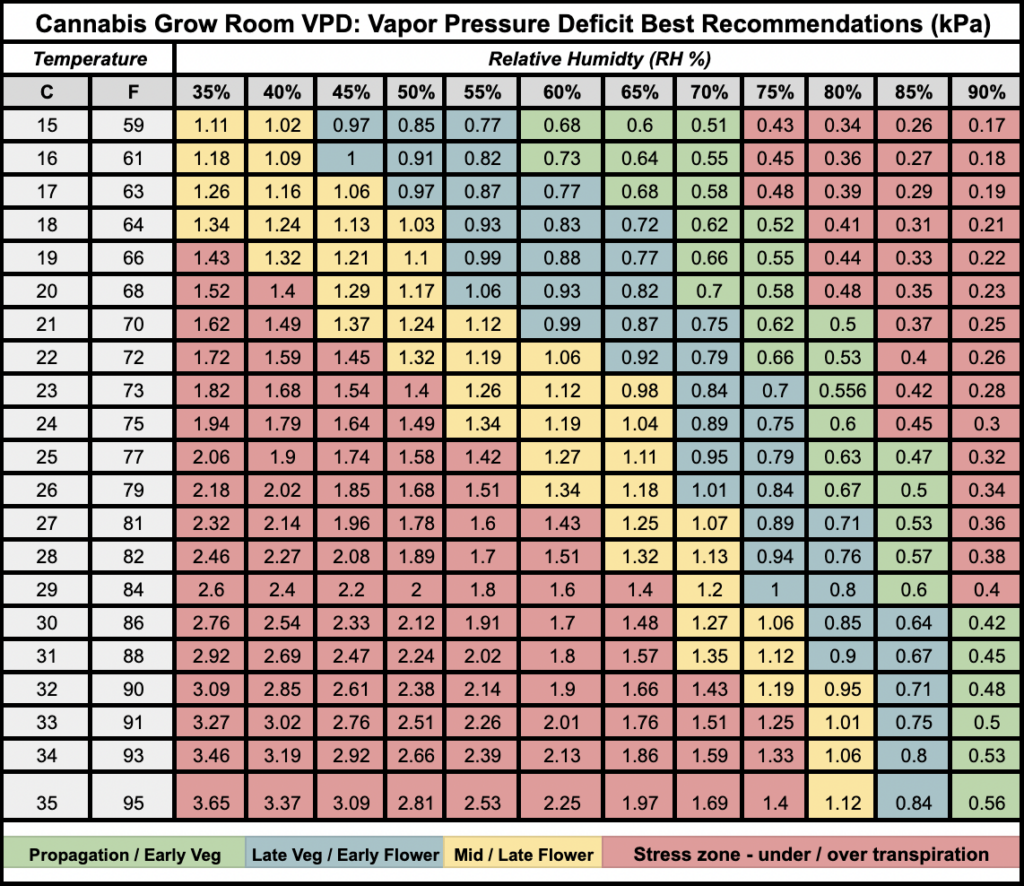
Optimal VPD Range for Cannabis Cultivation
To ensure healthy plant growth, the ideal VPD range for cannabis varies depending on the growth stage. During the vegetative phase, a VPD range of 0.8-1.2 kPa (kilopascal) is recommended. As the plants transition into the flowering stage, the VPD range should
be around 0.5-0.8 kPa. Staying within these ranges allows the plants to transpire effectively without experiencing water stress.
Strategies for Controlling VPD in Indoor Cannabis Cultivation
To maintain optimal VPD levels in your indoor cannabis cultivation, consider the following strategies:
- Temperature and Humidity Management: Proper temperature and humidity levels are crucial for regulating VPD. During the vegetative stage, aim for a temperature range of 68-82°F (20-28°C) and a relative humidity (RH) of 60-75% to achieve optimum VPD levels. These conditions can be maintained during the first half of the flowering stage as well. However, as flowers become denser (~week 5+), it is advisable to reduce the humidity to 40-50% to prevent issues like botrytis and mildew. Keeping the ambient temperature lower during this stage can help maintain VPD levels and enhance color development in the finished flowers, depending on genetic potential. During the final few weeks, maintaining low humidity becomes crucial to prevent bud rot and powdery mildew.
- Ventilation and Air Circulation: Implement a well-designed ventilation system to regulate temperature and humidity. This system should ensure proper air exchange and prevent stagnant air pockets. Adequate air circulation throughout the grow space helps maintain consistent VPD levels.
- Monitoring and Automation: Regularly monitor temperature and humidity levels using hygrometers and thermometers. Consider investing in automation systems that can adjust environmental conditions based on preset parameters. These systems can help maintain an optimal VPD range automatically. Additionally, setting up a humidifier and a dehumidifier in your grow room with an environmental controller can regulate humidity and VPD effectively.
Conclusion
Vapor Pressure Deficit (VPD) plays a critical role in indoor cannabis cultivation, impacting plant health, growth, and productivity. By understanding the importance of VPD and implementing effective strategies to control it, cannabis cultivators can create an ideal environment for their plants to thrive. Consistent monitoring, appropriate temperature and humidity management, along with proper air circulation, are crucial for achieving optimal VPD. These practices will contribute to a successful indoor cannabis cultivation journey, resulting in healthy, vibrant plants and bountiful yields.
Cooling Methods for Cannabis Grow Rooms: Maximizing Yields and Ensuring Optimal Temperatures
Introduction:
Maintaining the ideal temperature in a cannabis grow room is vital for healthy plant growth and maximizing yields. In this blog post, we will explore effective cooling methods that can help you create an optimal environment for your cannabis plants, promoting robust growth and successful cultivation.
1. Air Conditioning (AC) Systems:
Air conditioning units offer precise temperature control for indoor cannabis grow rooms. These systems remove heat and humidity from the air, ensuring stable temperature conditions. Oversizing your AC unit is recommended to combat heat stress and prevent mold pressure.
- Pros:
- Precise Temperature Control: AC systems allow you to set and maintain specific temperature ranges for optimal plant growth.
- Consistent Performance: AC systems provide stable cooling regardless of external weather conditions.
- Cons:
- Energy Consumption: Air conditioning can increase electricity costs. Consider using energy-efficient models or optimizing your setup to reduce power usage.
- Initial Investment: The upfront cost of purchasing and installing an AC system may be higher compared to other cooling methods.
2. Evaporative Coolers (Swamp Coolers):
Evaporative coolers cool the air by passing it through water-soaked pads. These coolers are suitable for areas with low humidity levels.
- Pros:
- Energy Efficiency: Evaporative coolers consume less energy compared to AC systems, making them cost-effective and eco-friendly.
- Lower Initial Investment: Evaporative coolers are generally more affordable than air conditioning units.
- Cons:
- Humidity Concerns: Evaporative coolers add moisture to the air, which can be problematic in high humidity environments or during the flowering stage.
- Limited Effectiveness: In regions with high humidity or hot and dry conditions, evaporative coolers might not provide sufficient cooling.
3. Ventilation and Air Circulation:
Proper ventilation and air circulation are crucial for maintaining optimal temperatures in a grow room. Use exhaust fans and intake vents to promote fresh air exchange.
- Pros:
- Cost-Effective: Ventilation relies on simple fans and vents, making it an affordable cooling method.
- Prevention of Hot Spots: Adequate air circulation helps prevent hot spots, ensuring uniform temperature distribution.
- Cons:
- Limited Temperature Control: Ventilation might not be enough to maintain precise temperature ranges, requiring additional cooling methods.
4. Water-Cooled Systems:
Water-cooled systems circulate cool water near grow lights or air intake, effectively reducing the overall temperature of the grow room.
- Pros:
- Effective Cooling: Water’s heat-absorbing properties make water-cooled systems highly efficient at cooling grow room temperatures.
- Reduced Energy Usage: Water-cooled systems often consume less energy compared to traditional AC systems.
- Cons:
- Initial Complexity: Setting up water-cooled systems may require professional assistance and can be more complex than other cooling methods.
- Maintenance: Regular maintenance is essential to prevent leaks or water quality issues.
Conclusion:
Creating the ideal temperature within your cannabis grow room is crucial for optimal plant health and successful cultivation. Consider different cooling methods such as air conditioning, evaporative coolers, ventilation, and water-cooled systems, depending on your budget, environmental conditions, and grow room size. Monitor temperature levels regularly and adjust your cooling system as needed to maintain the ideal environment for your cannabis plants.
Dehumidification in Cannabis Cultivation: Maintaining Optimal Humidity Levels for Healthy Plants
Introduction:
In indoor cannabis cultivation, finding the right humidity balance is crucial for plant health and maximizing yields. Excessive moisture can lead to issues like mold, pests, and stunted growth. In this blog post, we will explore the importance of dehumidification in cannabis cultivation, its benefits, and effective strategies to maintain ideal humidity levels in your grow room.
The Significance of Dehumidification in Cannabis Cultivation
Humidity directly affects plant transpiration, nutrient absorption, and water management. High humidity causes waterlogged roots and reduced nutrient uptake, leading to weakened plants and lower yields.
Key Benefits of Dehumidification:
- Preventing Mold and Mildew:
- Dehumidification reduces excess moisture, preventing mold and mildew growth that can damage your cannabis crop.
- Controlling Pests:
- Lower humidity levels discourage pests like fungus gnats, protecting your plants from infestations.
- Enhancing Transpiration:
- Proper dehumidification promotes healthy transpiration, ensuring optimal nutrient absorption and robust growth.
Effective Strategies for Dehumidification:
- Invest in Quality Dehumidifiers:
- Choose dehumidifiers appropriate for your grow room size. Portable units work for smaller setups, while commercial-grade dehumidifiers suit larger spaces. Ensure they have built-in hygrometers for accurate humidity measurement.
- Use Ventilation Systems:
- Set up a well-designed ventilation system with exhaust fans and intake vents to regulate humidity. Regular air exchanges expel excess moisture and introduce fresh, drier air.
- Control Watering Practices:
- Overwatering increases humidity levels. Follow a precise watering schedule and allow soil to dry between waterings, preventing waterlogged conditions and excess humidity.
- Monitor Humidity Levels:
- Regularly monitor humidity with hygrometers or environmental controllers. Aim for 60%-75% RH during vegetative stage and 45%-50% during flowering for optimal cannabis growth and mold prevention.
Conclusion:
Dehumidification is paramount in indoor cannabis cultivation for healthy plants and bountiful yields. By investing in quality dehumidifiers, optimizing ventilation, and monitoring humidity diligently, you can create an ideal growing environment. Implementing effective dehumidification strategies will result in healthy, high-quality cannabis crops protected from mold, pests, and stunted growth.
CO2 Augmentation in Indoor Cannabis Cultivation: Boosting Growth and Maximizing Yields
Introduction:
In indoor cannabis cultivation, carbon dioxide (CO2) levels play a crucial role in promoting plant growth and maximizing yields. CO2 augmentation is a technique used to elevate CO2 levels beyond ambient concentrations. In this article, we will explore the importance of CO2 in cannabis growth, its benefits, and practical implementation for indoor cultivation.
Understanding CO2 and Photosynthesis:
CO2 is a vital component of photosynthesis, the process that converts light energy into chemical energy, fueling plant growth. Plants absorb CO2 through stomata on their leaves and convert it into glucose, the primary energy source for development.
The Impact of CO2 on Cannabis Growth:
Increasing CO2 levels in an indoor cannabis grow room offers several benefits for plant growth and production:
- Faster Growth: Elevated CO2 levels enhance photosynthetic rates, leading to accelerated growth for cannabis plants during the vegetative and flowering stages.
- Enhanced Yield: CO2 augmentation has the potential to significantly increase final yields, resulting in larger, denser buds and higher overall production. On average, growers can expect a 20%-25% increase in yield when properly utilizing CO2 augmentation.
- Improved Nutrient Uptake: Elevated CO2 levels promote a more efficient nutrient uptake and utilization by cannabis plants, maximizing their ability to absorb essential elements for growth.
- Resistance to Stress: CO2 enrichment helps cannabis plants become more resilient to environmental stressors such as high temperatures and light intensity, allowing for healthier and more robust growth even under challenging conditions.
Implementing CO2 Augmentation:
To effectively implement CO2 augmentation in an indoor cannabis grow room, growers should consider the following key points:
- Monitoring CO2 Levels: Use CO2 monitors to measure and maintain the desired CO2 concentration in the grow room. The optimal range for cannabis cultivation is generally between 1000 to 1500 parts per million (ppm).
- Regulating CO2 Release: CO2 can be released using compressed CO2 tanks or generators that produce CO2 from natural gas or propane. It is crucial for growers to regulate the release rate to maintain consistent CO2 levels and avoid excessive fluctuations.
- Timing: CO2 supplementation should be synchronized with the light cycle in the grow room. Since plants require CO2 during the photosynthetic process, it should be provided when the lights are on. It’s important to consider the heat generated by CO2 burners and ensure that the cooling system can offset the additional heat.
- Proper Ventilation: Adequate ventilation is essential to prevent CO2 buildup and ensure the proper exchange of air. Proper airflow helps maintain a healthy environment for the plants and prevents stagnant CO2 pockets.
- Integrated Control Systems: Consider using automated CO2 control systems that synchronize with the light cycles and maintain optimal CO2 levels based on predefined settings. These systems can help maintain a consistent and controlled CO2 environment.
Safety Considerations:
It is important to approach CO2 augmentation with caution and follow safety protocols to avoid overexposure to CO2. Proper monitoring equipment and safety measures must be in place to ensure the well-being of operators and prevent any potential risks.
Conclusion:
CO2 augmentation is a valuable technique for maximizing cannabis production in indoor cultivation. By elevating CO2 levels within the optimal range and implementing proper controls and ventilation, growers can witness faster growth, increased yields, and improved plant health. Incorporating CO2 augmentation, alongside other best practices in indoor cannabis cultivation, will undoubtedly contribute to a successful and bountiful harvest.
Automating Your Indoor Cannabis Grow: The Power of Grow Room Controllers
Introduction:
To achieve maximum plant health and yields in an indoor cannabis grow room, growers rely on advanced technologies like grow room controllers. These controllers provide precise control over environmental conditions, ensuring optimal settings for cannabis plants. In this blog post, we will explore the functionalities of popular cannabis grow room controllers and how they empower growers to create an ideal cultivation environment.
- Temperature and Humidity Controllers:
- Temperature and humidity controllers maintain stable and comfortable conditions for cannabis plants. Equipped with built-in sensors, they monitor levels in real-time and activate ventilation, heaters, or dehumidifiers when necessary to restore optimal conditions.
- Light Controllers:
- By offering precise control over indoor grow lights, light controllers enable custom lighting schedules tailored to different growth stages. They automate light cycles, adjusting intensity and duration to mimic natural daylight patterns, promoting optimal photosynthesis and healthier plant development.
- CO2 Controllers:
- CO2 controllers regulate carbon dioxide levels inside the grow room, crucial for efficient photosynthesis. Through precise maintenance of the desired CO2 concentration, cannabis plants can reach their growth and development potential.
- pH and EC Controllers:
- pH and EC controllers ensure proper nutrient balance in hydroponic systems. Monitoring pH levels and nutrient concentrations, these controllers make automatic adjustments when needed, preventing nutrient imbalances and maximizing nutrient uptake.
- Environmental Data Loggers:
- Environmental data loggers record and store data over time, providing valuable insights into temperature, humidity, light levels, CO2 concentration, and more. Growers can analyze trends, identify issues, and optimize grow room conditions based on historical data.
- Integrated Controllers:
- Integrated controllers streamline the management of the grow room environment by combining multiple functionalities in a single unit. These all-in-one controllers offer automation capabilities, enabling growers to program and customize ideal environmental settings effortlessly.
Conclusion:
Grow room controllers are essential tools for indoor cannabis cultivation. They allow precise control over temperature, humidity, lighting, CO2 levels, pH, and nutrient concentrations, empowering growers to create optimal conditions for their plants. With
Water Management for Indoor Cannabis Cultivation: A Guide to Success
Introduction:
Proper water management is a crucial aspect of indoor cannabis cultivation, ensuring the health and vitality of your plants. In this comprehensive guide, we will explore the key factors involved in water management for indoor cannabis growing, enabling you to optimize your cultivation practices and achieve robust yields.
Key Factors:
- Understanding Your Cannabis Plants:
- To effectively manage water, it’s essential to understand the unique water needs of cannabis plants. Finding the right balance between water and oxygen in the root zone is critical. Overwatering can lead to root rot, while underwatering can cause stress and nutrient deficiencies.
- Choosing the Right Growing Medium:
- Selecting the appropriate growing medium is vital for water management. Options include soil, soilless mixes like coco coir, and hydroponic systems. Each medium has its characteristics and requires different watering approaches.
- Watering Techniques:
- Proper watering techniques are crucial for successful cannabis cultivation. Follow these guidelines:
- Water when the top inch or two of the growing medium feels dry to prevent overwatering and support healthy root development.
- Water slowly and evenly, ensuring even distribution of moisture throughout the growing medium.
- Avoid watering the leaves to prevent mold and mildew issues. Water at the base of the plant, directly onto the medium.
- Use a pH and EC meter to monitor water quality. Cannabis prefers a pH range between 5.7 and 6.5.
- Proper watering techniques are crucial for successful cannabis cultivation. Follow these guidelines:
- Drainage and Container Selection:
- Ensure proper drainage by using containers with drainage holes. Elevating pots slightly above a tray or saucer can further enhance drainage.
- Nutrient Management:
- Proper nutrient management is essential for optimal water utilization. Invest in a high-quality nutrient solution, following the manufacturer’s instructions. Avoid over-fertilization, as it can lead to nutrient lockout.
- Environmental Factors:
- Environmental conditions, such as temperature, humidity, and airflow, impact water management. Maintain a stable environment to prevent water stress in your plants.
- Monitoring and Adjusting:
- Consistent monitoring is key to effective water management. Observe your plants closely and adjust your watering schedule based on their needs. Signs of overwatering or underwatering include yellowing leaves and drooping plants.
Conclusion:
Mastering water management is essential for successful indoor cannabis cultivation. By understanding your plant’s water needs, choosing the right growing medium, employing proper watering techniques, and monitoring environmental factors, you can optimize water usage and promote healthy plant growth. With diligent attention to water management, you can achieve robust yields and high-quality cannabis in your indoor grow.
Choosing the Ideal Growing Medium for Indoor DIY Cannabis Cultivation
Introduction:
The choice of growing medium is crucial for successful indoor cannabis cultivation. Each medium offers unique advantages and considerations that can impact plant health and yields. In this informative guide, we will discuss different growing mediums commonly used in DIY indoor cannabis cultivation, helping you make an informed decision based on your cultivation goals.
Soil:
- Pros: Nutrient buffering, organic cultivation, enhanced terpene profile.
- Cons: Slower growth, risk of pests, nutrient variability.
Coco Coir:
- Pros: Excellent water retention, pH stability, lightweight.
- Cons: Requires nutrient supplementation, limited buffering.
Rockwool:
- Pros: Excellent aeration, easy to handle, sterile medium.
- Cons: pH management, environmental impact.
Hydroton (Expanded Clay Pebbles):
- Pros: Excellent aeration, pH stability, reusable.
- Cons: No nutrient buffering, limited water retention.
Deep Water Culture (DWC):
- Pros: Rapid growth, enhanced nutrient uptake, minimal medium.
- Cons: Technical expertise, equipment dependency.
Aeroponics:
- Pros: Optimal oxygenation, water efficiency, higher yields.
- Cons: Technical complexity, no room for error.
Conclusion:
Selecting the right growing medium is crucial for successful indoor DIY cannabis cultivation. Each medium has its advantages and considerations. Soil offers nutrient buffering and organic cultivation benefits, while coco coir provides excellent water retention. Rockwool is easy to handle but requires careful pH management. Hydroton offers good aeration. For a related topic, see our blog on choosing the right soil for autoflowering cannabis.
Synthetic vs. Organic Nutrients: Choosing the Right Option for Indoor Cannabis Cultivation
Introduction:
Feeding cannabis plants with the right nutrients is essential for successful indoor cultivation. When it comes to nutrients, growers have the choice between synthetic and organic options. Understanding the differences between them is crucial for making an informed decision that aligns with your cultivation goals. In this comprehensive guide, we will explore the characteristics, advantages, and considerations of both synthetic and organic nutrients for indoor cannabis cultivation.
Synthetic Nutrients:
- Pros: Precision nutrition, quick absorption, minimal residue, pH control.
- Cons: Environmental impact, salt buildup, lack of microorganisms.
Organic Nutrients:
- Pros: Slow release, improved soil health, environmentally friendly.
- Cons: Nutrient ratios, longer absorption time, potential residue.
Conclusion:
Choosing the right type of nutrients, whether synthetic or organic, is a decision that depends on your specific preferences, cultivation goals, and environmental considerations. Synthetic nutrients offer precise control over nutrient ratios and fast absorption, while organic nutrients promote soil health and long-term sustainability. Consider a hybrid approach by combining both types of nutrients for a balanced nutrient regimen. Regardless of the option you choose, proper nutrient management, monitoring, and adjustment based on the plant’s needs are essential for achieving healthy and thriving cannabis plants that yield impressive results.
Light Cycles for Indoor Cannabis Cultivation: A Guide to Optimal Timing
Introduction:
Controlling lighting plays a vital role in indoor cannabis cultivation, and proper light cycle timing is essential for plant growth and development. By understanding the significance of light cycles during the vegetative and flowering stages, growers can achieve healthy plants and maximize yields. In this informative blog post, we will delve into the importance of light cycle timing throughout these stages, providing valuable insights to help you cultivate thriving cannabis plants.
Vegetative Stage Light Cycle Timing:
Key Points to Note:
- Light Duration: Supply 18 hours of light daily to promote vegetative growth and strong root systems.
- Dark Period: Allow for 6 hours of uninterrupted darkness to facilitate plant recovery and hormonal balance.
- Light Intensity: Opt for moderate to high light intensity to encourage foliage development and prepare plants for flowering.
Flowering Stage Light Cycle Timing:
Key Points to Note:
- Light Duration: Adjust the light cycle to 12 hours of light each day to stimulate the transition to the flowering stage.
- Dark Period: Ensure 12 hours of complete darkness to trigger flowering and the development of resinous buds.
- Light Spectrum: Consider incorporating more red and far-red wavelengths to enhance bud growth and resin production.
Maintaining Consistency:
Consistency is crucial in light cycle timing to avoid stress and hindered plant development. Reliable light-timing equipment and backup power sources are highly recommended for uninterrupted cycles and successful cultivation.
Addressing Light Leaks:
Key Points to Note:
- Dangers of Light Leaks: Light leaks can induce hermaphroditism, reduce yields and potency, and increase stress in cannabis plants.
- Prevention and Detection: Regularly inspect the grow room for sources of light leaks, use light-proof materials, and ensure light-tight equipment and fixtures.
- Monitoring and Corrective Measures: Monitor light levels, take prompt action to seal any leaks, and remove affected plants if hermaphroditism occurs.
Conclusion:
Finding success in indoor cannabis cultivation requires a deep understanding of light cycles and their impact on plant growth. By following proper light cycle timing during the vegetative and flowering stages, growers can optimize their outcomes and cultivate thriving cannabis plants.
Remember, during the vegetative stage, provide 18 hours of light and 6 hours of uninterrupted darkness. This promotes vigorous growth and root development. In the flowering stage, adjust the light cycle to 12 hours of light and 12 hours of complete darkness. This simulates the natural shift from vegetative growth to flowering, triggering resinous bud development.
Consistency is key when it comes to maintaining light cycles. Avoid abrupt changes that can stress the plants and hinder their development. Ensure your light-timing equipment is reliable, and have a backup power source in case of interruptions.
Risks of Light Leaks
Additionally, be aware of the risks of light leaks. These leaks can cause hermaphroditism, reduced yields, and increased stress in plants. Regularly inspect the grow room for cracks, gaps, or openings that allow light to seep in. Use light-proof materials, such as blackout curtains or reflective films, and invest in light-tight equipment to minimize leaks. Monitor light levels during the dark period to detect any leaks and take immediate corrective action.
By implementing proper light cycle timing and addressing light leaks, you can create an optimal environment for your indoor cannabis cultivation, leading to healthy plants and bountiful yields.
Integrated Pest Management (IPM) for Indoor Cannabis Cultivation: Protecting Your Garden from Common Pests
Introduction:
Creating a controlled environment through indoor cannabis cultivation is crucial for optimizing plant growth and yields. However, pests can still find their way into your indoor grow room and threaten the health of your cannabis plants. Implementing effective pest prevention and management strategies is essential for maintaining a thriving garden. In this informative blog post, we will discuss common pests in indoor cannabis cultivation and provide actionable tips to prevent and manage infestations effectively.
Spider Mites and Their Prevention:
Prevention and Management:
- Regular Inspection: Check plants for signs of spider mites, focusing on the undersides of leaves.
- Spray Oils: Utilize natural spray oils to control and deter spider mites.
- Maintain Humidity: Control humidity levels to discourage spider mite infestations.
- Natural Predators: Introduce predatory mites as a natural way to control spider mite populations.
- Prevent Contamination: Prevent the introduction of spider mites into the grow room by showering and changing clothes before entering.
Fungus Gnats and Their Prevention:
Prevention and Management:
- Proper Drainage: Ensure proper drainage to avoid excess moisture in the soil.
- Sticky Traps: Place yellow sticky traps near the soil surface to catch adult fungus gnats.
- Soil Drying: Allow soil to dry between waterings to discourage fungus gnat larvae.
Aphids and Their Prevention:
Prevention and Management:
- Natural Predators: Introduce beneficial insects like ladybugs and parasitic wasps to control aphid populations.
- Insecticidal Soap: Use insecticidal soap or neem oil to manage aphid infestations with minimal impact on beneficial insects.
- Isolation: Isolate infected plants to prevent aphids from spreading to other plants.
Whiteflies and Their Prevention:
Prevention and Management:
- Reflective Mulch: Deter whiteflies by placing reflective mulch around your plants.
- Neem Oil: Apply neem oil to manage whitefly populations, repeating as necessary.
- Beneficial Insects: Release ladybugs and parasitic wasps to control whitefly infestations.
Thrips and Their Prevention:
Prevention and Management:
- Sticky Traps: Use yellow or blue sticky traps to monitor thrips and trap adults.
- Neem Oil: Disrupt the thrip’s life cycle and undermine their proliferation.
- Isolation: Quarantine new plants before introducing them to your indoor grow room to avoid introducing thrips back into your grow.
Conclusion:
Protecting your indoor cannabis garden from pests is an ongoing process that requires vigilance and proactive measures. By understanding common pests and implementing effective prevention and management strategies, you can ensure the health and vitality of your plants. Regular inspections, maintaining proper environmental conditions, introducing beneficial insects, and using natural remedies are key components of an Integrated Pest Management (IPM) approach. By staying ahead of potential pest issues, you can cultivate a successful and thriving indoor cannabis garden.
Nursery Management for DIY Indoor Cannabis Growing: Tips for Success
Introduction:
If you’re venturing into DIY indoor cannabis cultivation, managing a nursery is a crucial task that requires attention to detail. Whether you’re nurturing plants for personal use or planning to scale up for commercial production, proper maintenance is essential. In this informative blog post, we’ll guide you through the essential steps and expert tips for maintaining a thriving indoor cannabis nursery.
Sanitation and Hygiene Tips:
- Regularly clean and sterilize tools, equipment, and surfaces.
- Quarantine new plants to prevent potential issues.
- Practice proper hygiene by wearing clean clothing and gloves.
- Prevent cross-contamination in different areas of your nursery.
Climate Control Strategies:
- Maintain optimal temperature levels between 70-80°F (21-27°C).
- Control humidity around 70% for young seedlings, gradually decreasing to 50-60% as they mature.
- Ensure proper ventilation to prevent mold and supply fresh CO2.
- Use fans for even air circulation and to avoid hotspots or stagnant air.
Effective Light Management:
- Select appropriate lighting such as fluorescent or LED grow lights with a cool spectrum for young plants.
- Maintain a consistent light schedule, such as 18/6 or 24/0 for vegetative stage and 24/0 for clones.
- Adjust light intensity by positioning lights at an appropriate distance to avoid plant damage.
Proper Watering and Feeding Techniques:
- Water with clean, pH-balanced water and allow soil to partially dry before rewatering.
- Avoid overwatering, as young plants are susceptible to root issues.
- Start with a gentle, balanced fertilizer solution and adjust based on plant needs.
Container and Soil Considerations:
- Use appropriately sized containers to avoid overcrowding and promote proper root development.
- Choose high-quality, well-draining soil suitable for your specific cannabis strains.
Pest and Disease Management Strategies:
- Regularly monitor plants for signs of pests or diseases.
- Implement Integrated Pest Management (IPM) practices using natural predators, neem oil, or organic insecticides.
- Prevent diseases by avoiding overwatering, maintaining good airflow, and using sterilized tools.
Training and Pruning Techniques:
- Employ topping to encourage lateral growth by pinching off the main stem.
- Use Low-Stress Training (LST) to gently bend and tie down branches for a bushier and more even canopy.
Importance of Record-Keeping:
- Maintain detailed records of strains, feeding schedules, and encountered issues.
- These records assist in troubleshooting and improving cultivation techniques over time.
Conclusion:
In summary, managing an indoor cannabis nursery demands precision, dedication, and a green thumb. By maintaining cleanliness, providing optimal climate control, managing lighting, watering, and nutrition, and effectively addressing pests and diseases, you can foster healthy plants throughout their growth cycle. With patience and meticulous care, you’re on the path to a successful indoor cannabis cultivation venture.
Mom Stock: The Key to Consistent Cannabis Cloning Success
Introduction:
Maintaining a healthy “mom” stock of cannabis plants is essential for cultivators seeking consistent, high-quality clones. These carefully nurtured plants also serve as the genetic source, ensuring desirable traits are perpetuated throughout cultivation. In this comprehensive guide, we’ll delve into the crucial steps and expert tips for successfully maintaining a thriving mom stock of cannabis plants.
Step 1: Selecting the Perfect Mother Plant:
– Choose a vigorous, healthy plant with desired traits such as flavor, potency, and yield.
– Look for consistent growth patterns and resistance to common pests and diseases.
Step 2: Dedicated Space and Environment:
– Designate a separate area for your mom stock to minimize stress and contamination.
– Maintain a controlled environment with appropriate temperature, humidity, and lighting.
Step 3: Pruning and Training Techniques:
– Regularly prune the mother plant to encourage lateral growth and a bushy shape.
– Employ techniques like topping and low-stress training (LST) to promote the growth of strong branches.
Step 4: Regular Feeding and Nutrient Schedule:
– Develop a consistent feeding regimen that provides essential nutrients to your mother plant.
– Use a balanced nutrient solution formulated for the vegetative stage of growth.
Step 5: Preventive Care and Pest Management:
– Regularly inspect your mother plant for signs of pests or diseases.
– Isolate new acquisitions for a quarantine period to prevent potential contamination.
Step 6: Light Cycles and Photoperiod:
– Maintain the mother plant under an 18-24 hour light cycle to encourage continuous vegetative growth.
– Opt for energy-efficient LED or fluorescent lights to minimize heat stress and reduce energy consumption.
Step 7: Rotation and Replacement:
– Plan for succession by selecting new mother plants periodically to prevent genetic deterioration.
– Maintain a backup of your chosen genetics to ensure continuity.
– We recommend replacing mothers every 3-4 months to maintain a healthy clone stock.
Step 8: Stress Reduction:
– Minimize stress on the mother plant to prevent passing on unfavorable genetic traits to clones.
– Handle the plant gently during pruning, training, and transplanting.
Step 9: Watering and Hydration Techniques:
– Consistently water the mother plant, allowing the top inch of the soil to dry between waterings.
– Be mindful not to overwater, as it can lead to root rot.
Step 10: Observation and Documentation:
– Maintain a journal to track growth patterns, feeding schedules, and any issues encountered.
– Note changes in growth, health, or appearance to promptly address problems.
Conclusion:
Building and maintaining a thriving mom stock of cannabis plants is a fundamental aspect of successful cloning. By following the expert steps in this comprehensive guide, cultivators can ensure that their mother plants remain healthy and vibrant, providing high-quality genetic material for consistent cloning results. Remember to approach the process with patience, dedication, and a commitment to excellence, as the care invested in the mom stock directly impacts the quality and consistency of the cannabis crop.
Rockwool Cannabis Cloning: A Step-by-Step Guide for Successful Propagation
Introduction:
Cloning cannabis plants using rockwool is a popular method among cultivation enthusiasts seeking to propagate their favorite strains. By creating genetically identical copies of a parent plant, cultivators can ensure the preservation of desirable traits. In this comprehensive guide, we’ll provide you with detailed steps to successfully take cannabis clones using rockwool as the growing medium.
Step 1: Gather Supplies for Successful Cloning
– Rockwool cubes or slabs: Choose the appropriate size for your clones.
– Scalpel or razor blade: Ensure clean and precise cuts.
– Rooting hormone: Stimulates root growth for successful cloning.
– Sterile water: Essential for hydration and preventing contamination.
– Spray bottle: Allows for misting clones and maintaining optimal moisture levels.
– Cloning dome or plastic humidity dome: Helps regulate humidity levels during the cloning process.
– Cloning tray: Provides a stable base for rockwool cubes and collects excess water.
– Fluorescent or LED grow lights: Provide the necessary light for clone development.
– Optional: Temperature and humidity gauge for monitoring environmental conditions.
Step 2: Select a Healthy Mother Plant
Choose a mother plant displaying robust health and desired traits. This ensures that your clones inherit the characteristics you desire.
Step 3: Prepare the Rockwool Cubes
– Soak the rockwool cubes in pH-balanced water (between 5.5-5.8) for up to 24 hours.
– After soaking, allow the cubes to drain excess water by gently tilting them.
Step 4: Take Clones from the Mother Plant
– Use clean and sterilized scissors or scalpel to cut healthy branches at a 45-degree angle.
– Aim for clones that are around 4-6 inches in length, with 2-4 sets of leaves.
Step 5: Trim the Clones
– Remove the lower leaves, leaving only the top set of leaves on each clone.
– If the remaining leaves are large, consider trimming them by half to reduce water loss.
Step 6: Apply Rooting Hormone
– Dip the cut end of each clone into rooting hormone to promote root development.
– Remove any excess gel by gently scraping to avoid over-application.
Step 7: Insert Clones into Rockwool Cubes
– Gently insert the treated end of each clone into a pre-made hole in the rockwool cube.
– Ensure the clone is snug and stable within the hole, avoiding pushing through the bottom of the cube.
Step 8: Provide an Optimal Cloning Environment
– Place the rockwool cubes with inserted clones into a cloning tray for stability.
– Cover the tray with a plastic humidity dome or cloning dome to maintain high humidity levels.
– Position the tray under fluorescent or LED grow lights, providing 18-24 hours of light per day.
Step 9: Maintain Optimal Conditions for Clones
– Maintain a temperature range of 72-80°F (22-27°C) for optimal cloning success.
– Maintain humidity levels at 80-90% to prevent excessive moisture loss.
– Regularly mist the clones with sterile water to keep them moist and promote healthy development.
– Change the cloning dome daily to prevent excess moisture buildup and potential mold issues.
Step 10: Monitor Progress and Transplant Clones
– Within 7-14 days, roots should start emerging from the rockwool cubes.
– Once the roots are approximately 1-2 inches long, it’s time to transplant the clones into your desired growing medium.
Conclusion:
Using rock wool for cannabis cloning ensures successful propagation with genetically identical plants. By following the step-by-step guide provided, cultivators can confidently take cannabis clones and foster their growth in a controlled environment. Remember to monitor temperature, humidity, and lighting conditions to optimize clone development. With patience and care, you can achieve successful cannabis cloning and expand your cannabis garden with the desired genetic traits.
This is the End
You’ve reached the end of our Indoor Cannabis Guide for Home Growers. Please Let us know if you have any questions in the comments below, or shoot us a message on our contact page. We have tons of other blogs on growing, so keep looking around to learn everything you need to know. Thanks for tuning in!